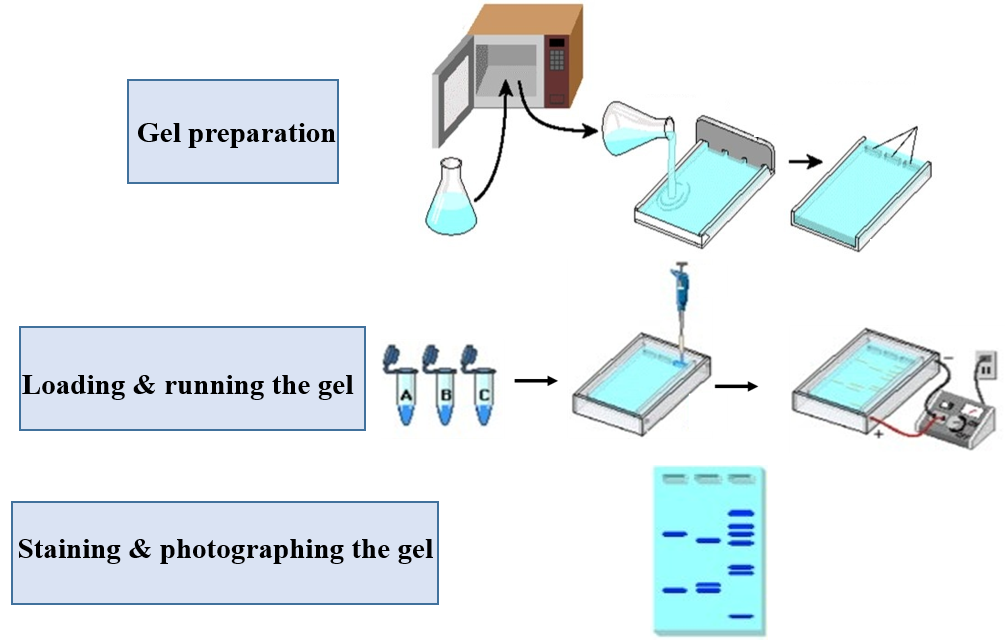
Agarose gel electrophoresis is a standard method for separating, identifying and purifying DNA fragments based on their sizes. DNA is negatively charged under alkaline buffer conditions (pH 8.0) and moves towards the positive electrode through the gel matrix in an electric field. Different DNA fragments have different migration rates in the electric field due to different molecular weight. Smaller molecules migrate more quickly than the larger ones, which enables the separation of different sizes of the DNA molecules and also helps in determining their length. After being irradiated with ultraviolet rays, different zones can be separated to achieve the purpose of separation, identification of molecular weight and screening of recombinants.
1. According to the amount of gel to be prepared and the concentration of the gel, add accurately weighed agarose powder into the Erlenmeyer flask with a certain amount of running buffer.
Note: The total liquid volume should not exceed 50 % of the flask's capacity. General speaking, 0.3-1.5% are pretty common gel percentages. There is a general guideline about percentage of agarose for resolving DNA fragment.
Table1. A general guideline for the concentration of agarose gel and linear DNA
|
% Agarose concentration in gel (w/v) |
Efficient separation range for linear DNA (bp) |
|
0.5% |
1 000~30 000 |
|
0.7% |
800~12 000 |
|
1% |
500~10 000 |
|
1.2% |
400~7 000 |
|
1.5% |
200~3 000 |
|
2% |
50~2 000 |
|
2%~5% |
20~1 000 |
2. Cover the mouth of the conical flask with parafilm or kraft paper and puncture some small holes in the film or paper, then heat in a microwave until the agarose dissolves. When the solution boils during heating, please wear heat-proof gloves and carefully shake the flask to make the agarose fully and evenly dissolved. Repeat this operation several times until the agarose is completely dissolved.
Note: Avoid overboiling the solution, because the final concentration of the gel will alter due to the evaporated liquid.
3. Leave the solution to cool down to about 55 °C for several minutes but do not leave it too long to avoid the agarose starting to solidify. If necessary, add ethidium bromide (EB) solution (final concentration 0.5 μg/ml) or Nucleic Acid Staining Solution at the ratio of 5 μL / 100 mL, and mix well.
Note: EB is a mutagenic compound, please take protective measures including wearing gloves and lab coat when handling with it. So make sure you don’t get any on your fingers or on yourself, and don’t spread it around the lab.
4. Pour the agarose solution into the mold, and immediately insert a comb in the appropriate position. The thickness of the gel is generally between 3 and 5 mm.
Note: If you need to cut and recover the band, the gel can be thickened appropriately.
5. Allow the gel to solidify at room temperature about 30 minutes, then remove the comb carefully. Position the gel into the gel electrophoresis tank. Avoid bubbles! Add enough TBE buffer (configured in advance) to cover the gel.
● Loading & running the gel
1. Take an appropriate amount of sample and mix it with 6× loading buffer (for example: 1 μl sample and 5 μl 6× loading buffer), and carefully add it to the sample tank with a micropipette.
Note: The loading buffer contains a dense or viscous substance that gives your DNA sample weight so it sinks down into the well. In addition, it also contains tracking dyes that visibly migrate, allowing for the estimation of the distance that DNA fragments have migrated.
2. Load the mixtures (a molecular weight ladder into the first lane as the reference), please taking care not to puncture the well bottoms. Avoid making bubbles!
Note: After adding a sample, replace the pipette tip to prevent mutual contamination.
3. Attach the electrical leads, make sure cords are correctly plugged into the power supply (red to red, black to black). Apply a voltage of 1-5V/cm and run the gel until the gel-loading buffer stain has migrated ¾ of the way down the gel.
● Staining & photographing the gel
1. Turn off the current and remove leads. If there is no EB or Nucleic Acid Staining Solution in the butter previously. You need to stain the gel in the EB solution for several minutes and rinse with distilled water.
2. Carefully place the gel on an ultraviolet transilluminator and take a photo to record.
Note: UV illumination is damaging so please avoid yourself exposing in it.
Important tips
1. 5×TBE buffer solution will precipitate if it is left for too long, so do not prepare it too much at one time. 0.5×TBE buffer is used when performing electrophoresis, so you need dilute the 5×TBE buffer stock solution for use.
2. The buffer used for electrophoresis and the buffer used for gel preparation must be unified.
3. When the gel is not used immediately, please wrap the gel with parafilm and store it at 4°C. Generally, it can be stored for 2 to 5 days.
If you have any questions,please email us at sales@brainvta.com.
 sales@brainvta.com